Trekking pole guide
Everything you need to know about setting up, adjusting and using trekking poles – simply explained and ready for your next tour.
Trekking poles can support you on many routes – while hiking, on longer trekking tours and while travelling. In this guide we show you step by step how to set up foldable trekking poles, adjust them to the right height, use accessories sensibly and care for your poles after the tour.
Chapter 1: Setting up trekking poles
Before your first tour, foldable trekking poles should be set up correctly and locked securely. They are ready to use in just a few steps.
 1
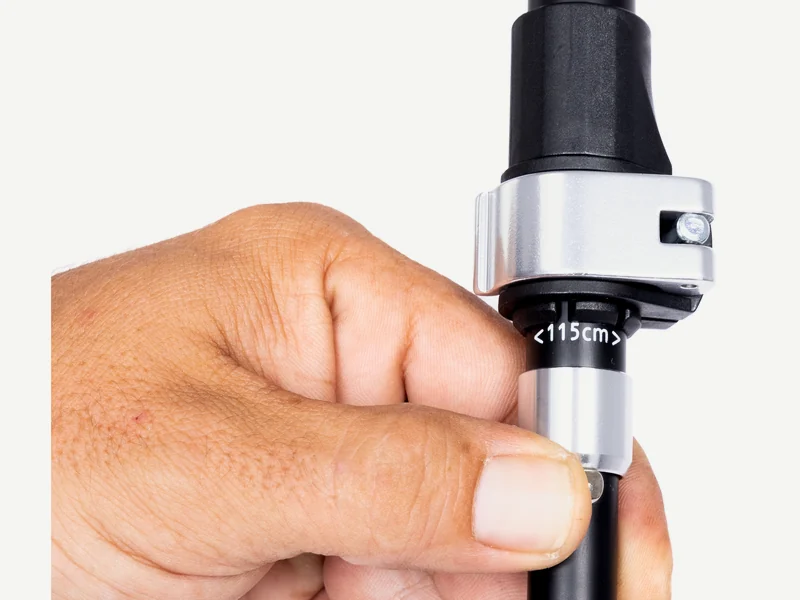
1Close the lever lock
Close the lever lock on the upper section before unfolding. Otherwise the lower section can slip out of the grip later on.
 2
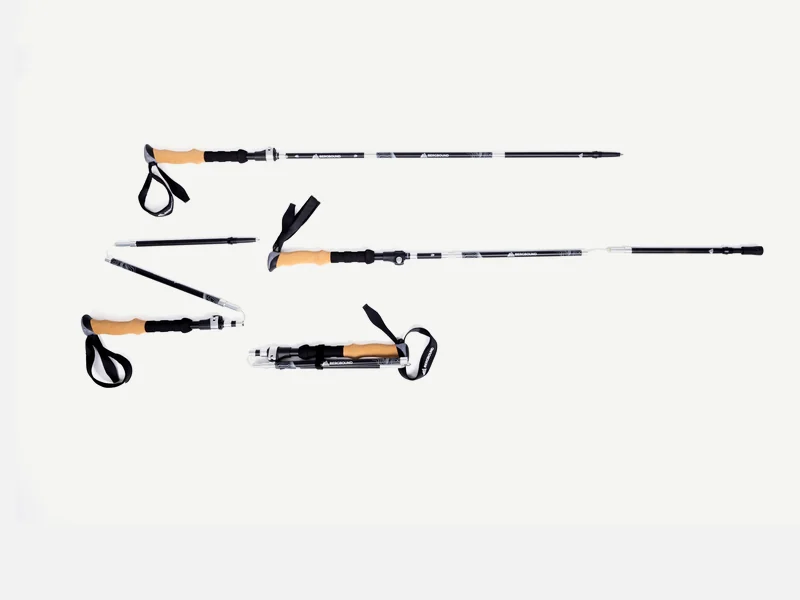
2Unfold the pole
Open out all segments fully and push the joints firmly together until no gap is visible.
 3
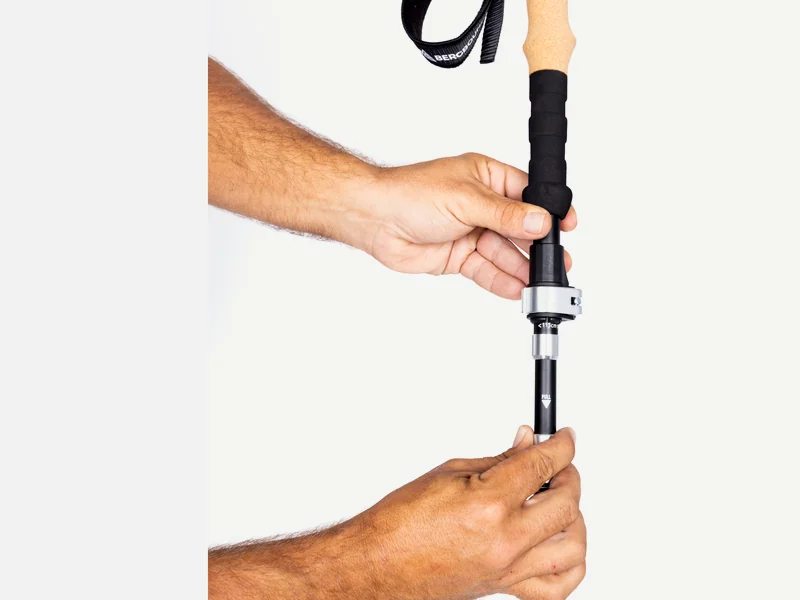
3Lock the segments
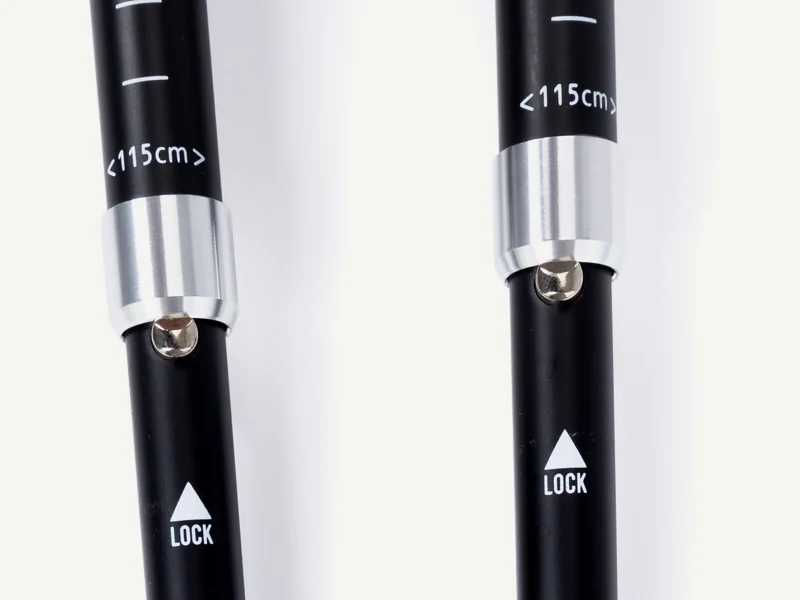
Hold the grip and pull the lower section downwards until the locking button clicks audibly and noticeably into place.
 4
4Check the lock
Make sure the locking button is fully extended and visible above the LOCK marking.
Adjusting the lever lock
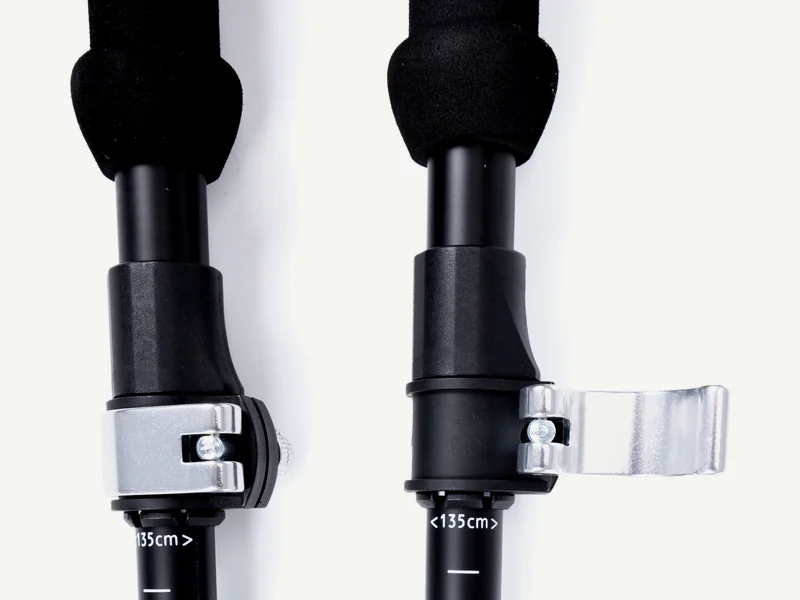
Open the lever lock, set the pole length you want and close it fully again. If the lock is too loose or too tight, open it once more and turn the adjusting screw in small steps: clockwise to tighten, anticlockwise to loosen. Then close the lever lock and check that the pole does not collapse under load. The lock should close with clearly noticeable but not excessive resistance.
Using the wrist strap correctly
Reach up through the wrist strap from below and then take hold of the grip. This way the strap sits comfortably against your hand and supports you while walking, without you having to grip tightly the whole time. On difficult or steep sections it can make sense not to use the strap, so you can let go of the pole quickly.
Chapter 2: Setting the right height
The right pole length provides more comfort, stability and a natural movement while hiking. As a guide: when the pole tip is on the ground, your elbow should form roughly a 90-degree angle. Depending on the terrain, you can adjust the length slightly.
- Basic setting – Set the trekking pole so that your forearm is roughly horizontal when the pole tip is on the ground. This setting suits flat paths and most normal hikes.
- Uphill – On the ascent the trekking poles can be set slightly shorter. This keeps your arms closer to your body and makes the poles easier and more controlled to use.
- Downhill – On the descent the trekking poles can be set slightly longer. This improves stability, gives more reach and can help to relieve knees and joints on steeper paths.
- Note on the scale – The integrated scale makes it easier to set the length you want. Before every tour, check that both trekking poles are set to the same length and locked securely.
Chapter 3: Using accessories correctly
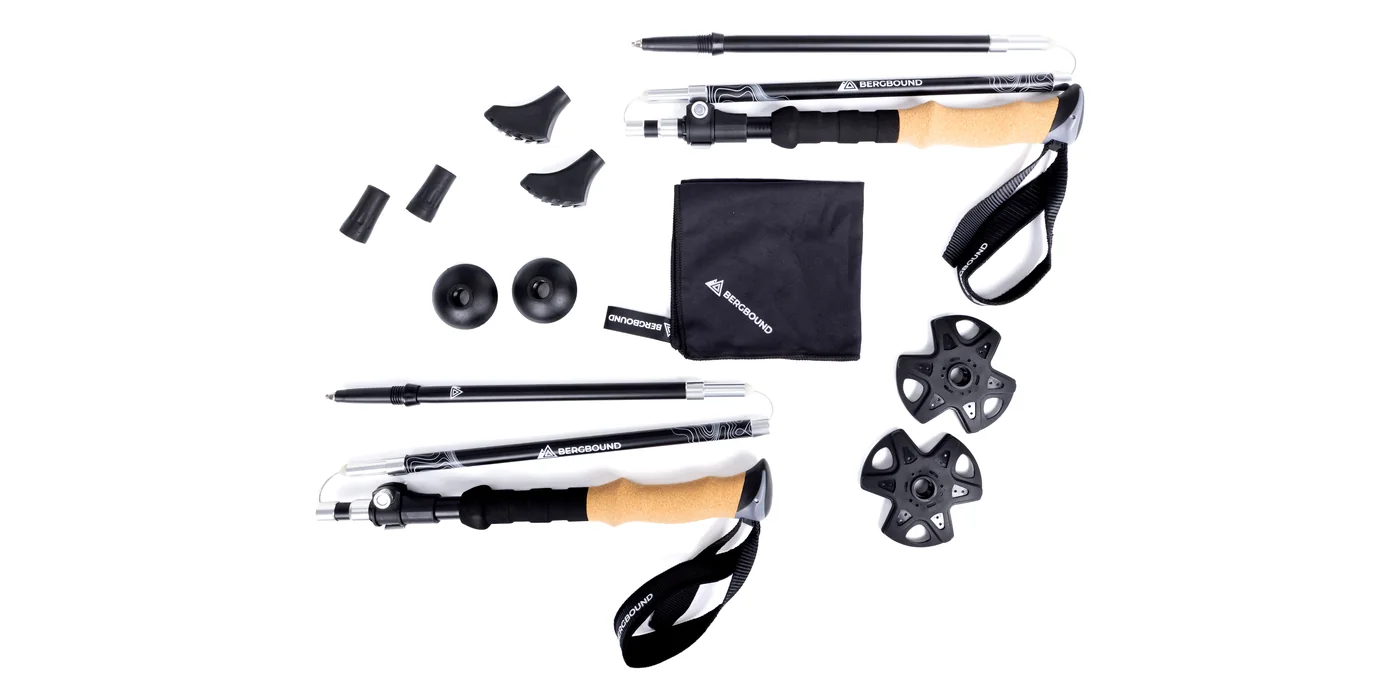
Depending on the surface, the right attachment provides better grip, more comfort and less wear. The BERGBOUND trekking poles come with various pads and baskets that you can change quickly and easily depending on the ground.
Asphalt pads
For paved paths, roads and hard surfaces. They dampen noise, improve ground contact and protect the tip from wear.
Nordic walking pads
For firm paths, asphalt and longer distances. Their shape supports a comfortable rolling motion while walking.
Snow baskets
Increase the contact area and reduce sinking deeply into snow. Particularly suitable for winter hikes.
Mud baskets
Help on soft, muddy or loose ground. They prevent sinking in too deeply and provide better control.
Tungsten tip
Reliable grip on natural trails, gravel and rocky terrain. Can be used directly on soft or unpaved paths.
Microfibre towel
Can simply be attached to your rucksack or to the trekking poles and is quickly to hand on the trail.
A quick check before your hike: Before every hike, check that the attachments sit firmly and match the surface. That way you are safer and more comfortable on the trail while also protecting the material.
Chapter 4: Folding down and storing
This is where many people struggle – usually because the tension is not taken off the pole, or the locking button is not pressed. Follow this order and it works without force and without damage.
 1
1Open the lever lock
Open the lever lock and take the tension off the pole completely.
 2
2Press in the locking button
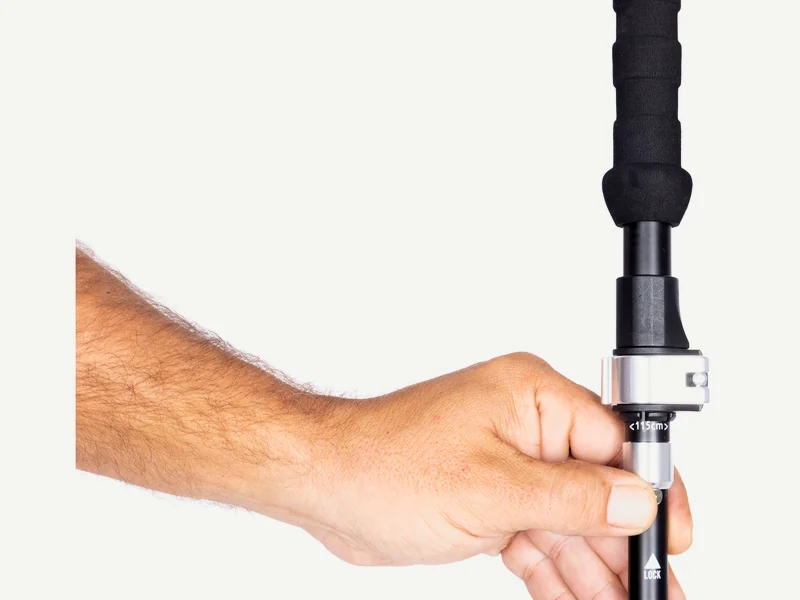
Press the locking button in and keep it held down.
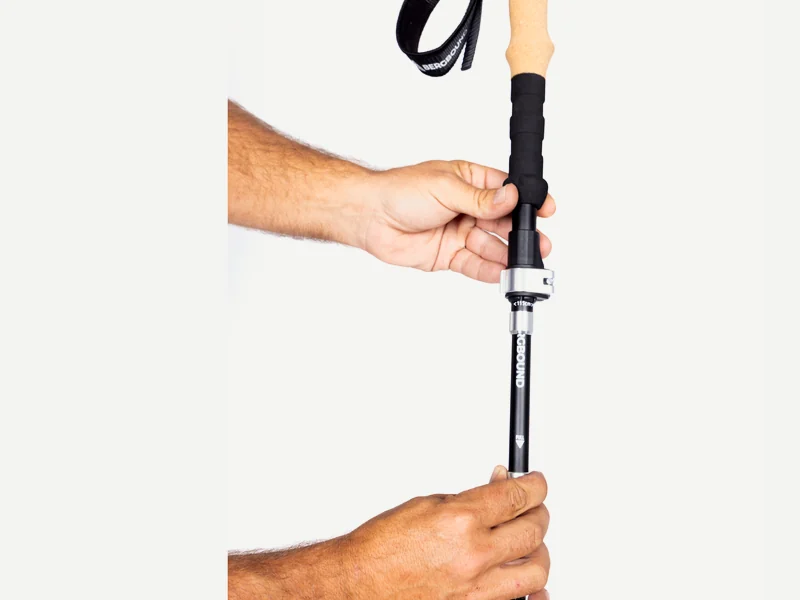 3
3Push the lower section back in
With the locking button held down, push the lower section back into the grip.
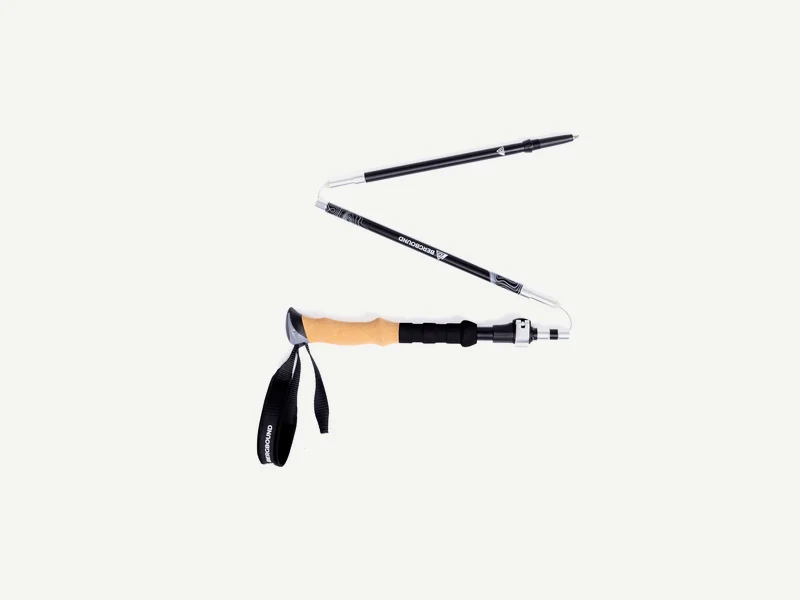 4
4Separate and fold the segments
Pull the segments apart at the joints, fold them together and stow the poles in the carry bag.
Tip: Let the poles dry completely before stowing them, and store them with the lever locks open.
Chapter 5: Care & storage
With just a few steps your trekking poles stay clean, smooth-running and reliable. Clean them after your tour, let damp parts dry completely and regularly check the lever locks, tips and attachments.
Clean after the tour – Remove dirt, dust and moisture with a soft cloth; for heavier soiling, carefully use clear lukewarm water.
Dry before storing – After rain or snow, let the poles dry completely before folding and storing them – this avoids moisture inside and wear.
Store in a dry place – Store the trekking poles in a dry place, protected from permanently high humidity and direct sunlight.
Check regularly – Before every tour, check the lever locks, wrist straps, tips and attachments; tighten or replace loose and damaged parts.
A short check before the tour and a little care afterwards help to keep your BERGBOUND trekking poles reliable for a long time.
BERGBOUND Trekking Poles
Our trekking poles are developed for hiking, trekking tours and travel. The foldable design saves space in your rucksack and luggage, while 7075 aluminium, a cork grip, lever locks and the included accessories allow versatile use – from a forest path to a longer trekking tour.
Frequently asked questions
The most important answers about the BERGBOUND trekking poles – short and clear.
What body heights are the trekking poles suitable for?
The BERGBOUND trekking poles are height-adjustable from 115 to 135 cm and therefore suit many body heights. As a guide: when the pole tip is on the ground, your elbow should form roughly a 90-degree angle.
How heavy are the trekking poles?
One trekking pole weighs approximately 305 g – comfortable to carry, especially on longer hikes and travels.
Are the trekking poles suitable for beginners?
Yes. The simple setup, the adjustable length and the foldable design make the trekking poles easy to use for beginners too.
Can I change the attachments?
Yes. Pads and baskets can be changed quickly and easily depending on the surface – asphalt pads, Nordic walking pads, snow and mud baskets are included in the set.
How small do the trekking poles fold down?
Folded down, the trekking poles have a folded size of 37 cm and therefore fit into a rucksack, suitcase or travel luggage.
How do I care for the trekking poles correctly?
Clean them after your tour, let damp parts dry completely and regularly check the locking mechanism, wrist straps and attachments. This keeps the poles reliable for a long time.
Discover BERGBOUND products
Looking for reliable outdoor gear for your next hike? Discover functional products by BERGBOUND – developed with a focus on quality, reliability and durability.
Questions? We are happy to help.
Do you have questions about our products or about BERGBOUND? Simply send us an email – we look forward to your message and will reply as soon as possible.